Bathroom tiles - how to plan the layout around the bath, the niche and the fall
· 12 min read
In a bathroom it is the top edge of the bath and the line of the fall that set the joint grid, not the floor. What follows from that for cut tiles, the niche and the access hatch.
A two-centimetre strip of tile on a living room floor disappears under the sofa. The same strip in a bathroom runs just above the rim of the bath, at the eye level of whoever is sitting in it, and stays there for ten years.
What puts it there is arithmetic that could have been done before the first cut. The joint grid has to agree at once with the bath, with the niche for toiletries, with the duct casing and with the fall to the drain, and each of those has a height of its own, fixed before we ever picked up a tape measure.
A small bathroom has nowhere to hide its cut tiles
One room runs through the whole text: a bathroom of 170 × 250 cm in a block of flats, ceiling at 250 cm. Against the shorter wall, opposite the door, stands a bath of 170 × 70 cm. In the corner by the entrance runs a duct casing of 30 × 30 cm with an access hatch, and above the bath we are planning a niche for toiletries recessed into the wall. That leaves a floor of 170 × 180 cm less the casing, so 2.97 m².
A 60 × 60 cm tile with a 3 mm joint gives a module of 60.3 cm. Along 170 cm two whole tiles fit with a 49.4 cm piece over, along 180 cm two whole and 59.4 cm. The whole floor is nine tiles, of which four go down whole.
Five cut tiles out of nine means that each of them takes up more than a tenth of what we see from the doorway. In a living room of 25 m² the proportion is the other way round and a badly set grid dissolves into the background. Here there is no background, and on top of that we look at this floor from two metres, not from six.
We set out the grid on the wall only once we know two heights
The order of the work looks like a matter of organisation, and it decides which cut tile we end up looking at. Starting with the walls, we keep glue and grout off a fresh floor. Wall courses are measured from the finished floor, though, and at that moment it does not exist yet.
In practice we separate the two. The walls go up from the second course, the bottom course is left until the end and cut in to the finished floor. The cut piece lands at floor level, where silicone and shadow cover it.
Before we strike the first line on the wall we need two numbers: the level of the finished floor and the height of the top edge of the bath. We find both already fixed, and it is to them that we fit the grid.
The top edge of the bath is the line we count courses from
In a typical installation the rim of the bath comes 55–58 cm above the floor; let us take 58 cm. Above it 192 cm of wall is left to the ceiling. We lay a 30 × 60 cm tile horizontally with a 2 mm joint, which gives a vertical module of 30.2 cm.
Measuring the courses from the floor looks innocent until we do the division. The first joint falls 30.2 cm above the floor, the next ones every 30.2 cm, the eighth at 241.6 cm. A strip of 8.4 cm is left under the ceiling, which still passes. The line of the bath comes off worse: the rim at 58 cm crosses the second course 2.4 cm before it ends, so a strip the thickness of a finger appears above the rim.
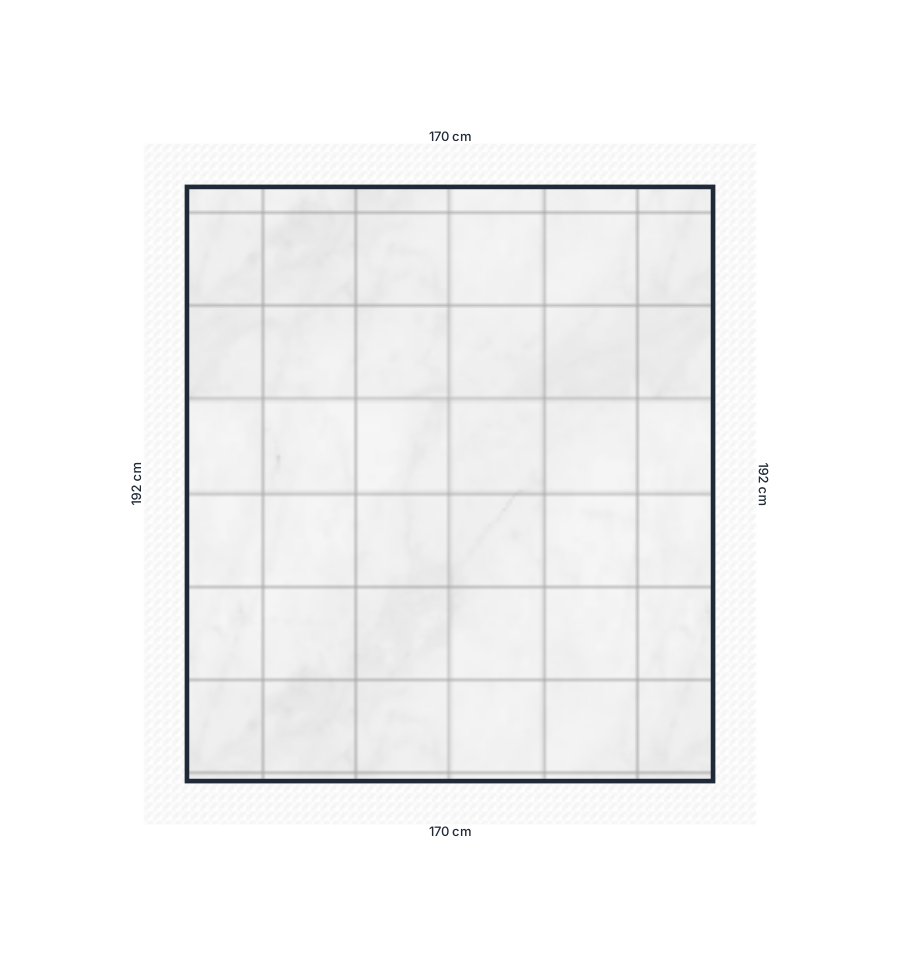
We set the same wall out from the edge of the bath and the division comes out differently. Six whole courses take up 181.2 cm, 10.8 cm is left to the ceiling and that is where the only cut piece goes. A whole tile lies above the bath.
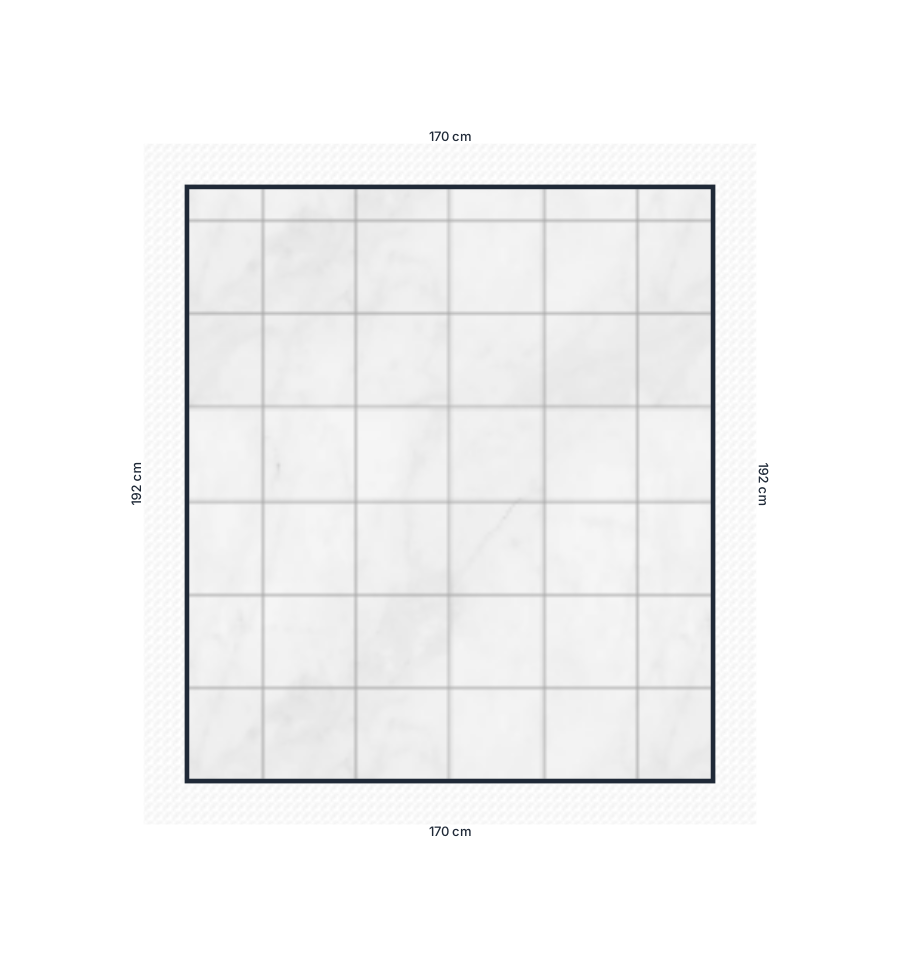
The same rule as on the floor, set out in the guide on where to start tiling, works here turned into the vertical. We push the cut piece up under the ceiling, where we look at it at a sharp angle and from three metres, because above the bath we have it square on and from half a metre.
In a bathroom without a bath the same part is played by the washbasin counter, the top edge of the frame or the sill of the shower niche. One horizontal line gets a whole tile, and the rest of the wall arranges itself around it.
A niche fits the grid only if we worked it out before buying
The niche above the bath is a frame let into that same grid. Its four edges cross the courses wherever they happen to fall, and if we miss the joints with them, a border made of four different cut pieces appears around the opening.
With a 30 × 60 cm tile and a 2 mm joint the horizontal module is 60.2 cm and the vertical one 30.2 cm. An opening of 60.2 × 30.2 cm falls exactly on the centres of the joints and eats one field of the grid, that is the whole tile we have just laid above the rim. A taller niche we make from two fields: 60.2 × 60.4 cm.
Ready-made units miss that dimension as a matter of course, because manufacturers settle them independently of the tile format: the Schlüter KERDI-BOARD-N niche measures 305 × 508 × 89 mm. What we pay for with a border of cut pieces is a factory-sealed surface that saves work on the waterproofing.
A niche cut into a building board costs more work and gives any dimension we like in return. If the niche is to disappear into the grid, its opening is settled after the module has been worked out, and not while choosing a ready-made unit.
The access hatch and the holes for the tap shift the whole grid
The duct casing in the corner by the door is the third element that has to agree with the grid. Magnetic hatches for tiling over are made in fixed sizes - 250 × 330 mm, 300 × 300 mm, 300 × 600 mm - and their frame stands in for a joint, so it only disappears once it coincides with a whole tile. On a grid of 30 × 60 cm tiles a 300 × 600 mm hatch is invisible, while a 300 × 300 mm one leaves a tile cut in half.
The tap connections work the same way. At the standard spacing of 150 mm a tile 60 cm wide takes both holes whole, as long as no joint runs between them. A joint means two half circles cut in two tiles, and those never meet exactly, because the width of the joint still separates them.
Moving the starting point by a few centimetres settles what no cut will settle, because it changes the position of every joint at once and puts them where they are missing.
The fall spoils the grid only where it breaks
Consider a variant of the same room: in the place of the bath, over an area of 170 × 90 cm, we build a shower without a tray. The floor under it is laid with a fall of 1–2%, and up to 2.5% for larger showers. Over 90 cm of travel to the drain at 2% that comes to a height difference of 1.8 cm, and over a single module of 60.3 cm, 1.2 cm.
A steady fall spoils nothing: the whole plane is tilted, the joints run straight, and a large-format tile lies on it as well as it lies on the level. The trouble starts at the break.
A linear drain gives one break, the meeting of the tilted zone with the level rest of the floor. The tile that line passes through has to be cut along it, or it will rock. Here a zone 90 cm deep ends 29.7 cm into the second tile, and shifting the grid so that a joint lands on 90 cm moves the remainder under the drain channel. The depth of the shower zone comes out of the module of the grid and is only then rounded to centimetres.
A point drain calls for a four-way fall, which means four breaks running along the diagonals, and a 60 × 60 cm tile will not bend along a diagonal. Hence the mosaic in older shower trays: a 5 × 5 cm piece follows the four-way fall by itself.
The floor joints and the wall joints will not meet, and that is not a fault
Back to the variant with the bath. A floor of 60 × 60 cm tiles with a 3 mm joint has a module of 60.3 cm, a wall of 30 × 60 cm tiles with a 2 mm joint, 60.2 cm. After four tiles the drift is 4 mm, after eight 8 mm, and it goes on growing, although both formats carry the same name.
On top of that the nominal size and the real one part company: a tile described as 60 × 60 cm is in fact often 59.7 × 59.7 cm, and the standard PN-EN 14411 allows that deviation. Rectification brings the error down to ±0.3 mm and there it ends.
The conclusion is less ambitious than the renderings promise: we can hold the joints continuous on one wall, chosen deliberately. Here it is the wall with the bath and the niche, because that is the one we look at from the doorway. On the others the joints will drift apart and nobody will notice, as long as the layout has not promised a symmetry it fails to deliver.
Small floor area does not force a small tile
The belief that only small tiles suit a small bathroom is older than rectified formats and does not follow from the arithmetic.
The sum for our room comes out even. A 60 × 60 cm tile with a 3 mm joint gives nine pieces, so 3.24 m² of material. A 30 × 30 cm tile at the same joint has a module of 30.3 cm, six columns by six courses, thirty-six pieces and exactly the same 3.24 m². The area comes out identical, and the number of cuts rises from five to eleven.
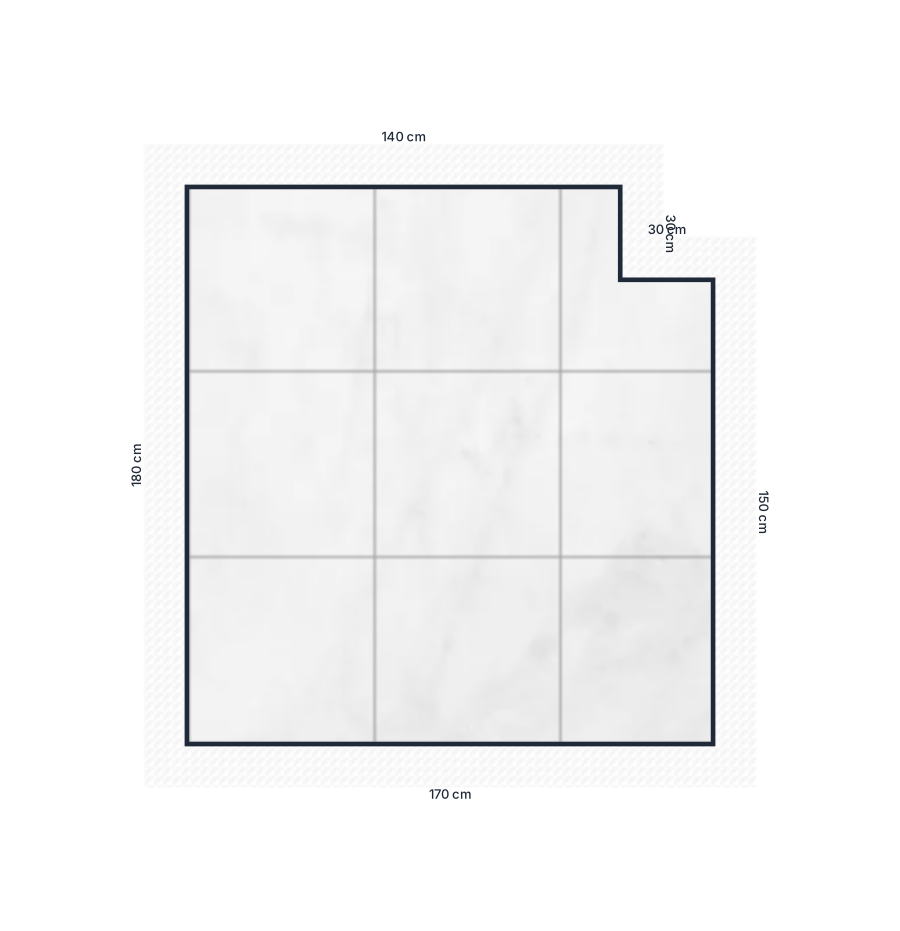
The large format loses in two places: in a shower zone with a point drain, where the tile would have to lie on a four-way fall, and in a room that takes only three columns, because shifting the grid then changes both edges at once. With six columns we have twice the room to manoeuvre.
Before the tile goes into the basket
All this arithmetic is simple, it just repeats itself with every change of format, joint and starting point. In a bathroom we have a dozen or so such changes, because every wall is worked out separately.
That is what the HandyLay planner was built for. We draw in it the surface we are actually laying, so the floor is a rectangle of 170 × 180 cm - the bath takes up the rest of the room and there are no tiles under it. The duct casing we subtract from that rectangle as a separate 30 × 30 cm square. In the pattern editor we set the size of the tile and the width of the joint in millimetres, dragging the pattern moves the starting point, clicking a tile shows its size once cut together with the offcut dimensioned, and the summary for the whole surface gives how many tiles go in and how many of them lie whole.
The wall above the bath we draw in the same way, shortened by the height of the rim: 170 × 192 cm instead of 170 × 250 cm. The bottom edge of the drawing then lies exactly where the rim is, so a pattern pushed up against it reproduces the second of the diagrams; the first we get by drawing the full 170 × 250 cm. The niche we subtract from that wall just as we subtract the casing from the floor. The application does not know that this is a wall, and it does not need to, because the division comes out identically.
Where these numbers come from
- Sevante, the height of a bath tap - the top edge of the bath 55–58 cm above the finished floor.
- Schlüter-KERDI-BOARD-N at Mosafil - a ready-made niche of 305 × 508 × 89 mm.
- Polysan, magnetic access hatches for tiling over, 300 × 600 mm and Aqualine PD203, 250 × 330 mm at Castorama - the fixed commercial sizes of hatches for tiling over.
- Laveo, the spacing of shower tap connections - the standard connection spacing of 150 mm.
- RUBI, the fall under a shower - cutting and laying techniques - a fall of 1–2% and up to 2.5% for larger showers, one break with a linear drain, a four-way fall with a point drain.
- Dekordia, the real size of tiles - a 60 × 60 cm tile with a real size of 59.7 × 59.7 cm, deviations allowed by the standard PN-EN 14411.
- Artileo, calibrated tiles and tile calibre - edge rectification accurate to ±0.3 mm.